 I've tried making donuts (or doughnuts?) before, but never really loved them. They were missing that light, fluffy taste when you bit into them. And the glaze was also tricky. Sure, they weren't bad and the fact that you could eat such a freshly-made donut partially made up for its obvious shortcomings. This last week I made some donuts out of some spare dough from making scones (fried bread version). After my wife and I tasted the donuts, we wanted to find some others to try them. We thought the donuts were pretty good, and our victims... I mean friends... seemed to like them. There were some problems to fix, but they looked pretty good. Then the next day I took the leftovers to work. I knew I could get some brutally honest feedback from my co-workers. To my dismay, the donuts didn't look good anymore. In fact, they looked a little soggy. Thanks to some collaboration and a little problem solving, I knew what needed to change. Here are the conclusions I came to after comparing my donuts to Krispy Kreme donuts: - Donut dough has to be airy. If not, then it's just a roll with a hole. To accomplish a lighter, softer donut I needed a softer ingredient. I remembered a Food Network show on Spudnuts which have a significant amount of potato flour. I increased my potato ingredient to accomodate this. Also, when mixing the dough, I mixed it for a relatively short time. I wasn't anxious in chewy bread, so I kept the mixing/kneading time to a minimum. I also added more yeast in an attempt to ensure that the dough wasn't going to be low on lifting power.
- Size matters. My original donuts were way too big. They looked awesome, but it also required longer cooking to ensure that the entire dough was cooked. I switched to a smaller donut that could be managed better.
- Icing has to be hot and thicken when it hits room temperature. My donuts were soggy because I had diluted my icing enough to spread on the donut, but then the icing was so runny that the donut absorbed it. To remedy this, I created a thicker icing and kept it warm in a double-broiler. I had a glass pan in a metal pot with water. I would keep the icing stirred with a metal whisk. If it ever got thick enough that it was not easy to apply to the donuts, i would add a small bit of water. The icing had to be hot in that pan. When I dipped the donut in the icing, it had to run off and then set up quickly. Having a "crusty" icing solves the soggy donut problem.
So enough analyzing, let's get on with the recipe! I'm sure it could be improved, so if you do improve the recipe I would love to know what you change through a comment on this post. Doughnut Ingredients:- 2 cups milk
- 1/2 cup shortening
- 2 cups mashed potatoes
- 3 tablespoons yeast
- 1/2 cup warm water
- 2 eggs
- 1 cup sugar
- 2 teaspoons salt
- 8 cups flour
Icing Ingredients: - 3 cups powered sugar
- 1 tablespoon butter
- 1 teaspoon vanilla
- About 1/4 cup water
Directions:- Since I use potato pearls (dried potatoes that just need to be hydrated to use) I combine the milk, shortening, potato pearls and corresponding water (2 cups) in a bowl. I put that in the microwave for 3 minutes. It greatly simplifies the work.
- On the side, put the yeast with the warm water to get it activated while the hot stuff cools down.
- Mix the eggs, sugar, salt with the milk/potatoes/shortening mixture and then add the yeast. Make sure to not add the yeast until it the rest of the mixture is warm and not hot.
- Add the flour.
- I mix all of this in a Bosch mixer, but any mixer will do. I think part of the secret of the dough is to not mix it too much. Overmixing can produce some great gluten strands that make your final product more chewy. Good for bread, not so great for doughnuts.
- Optional: let raise for an hour or so until the dough has doubled in size. I'm not sure this is necessary, but it may give a fluffier doughnut. I've tried both ways with a small difference.
- Cut into doughnuts with whatever you can find to cut circles. =) I used a plastic cup for the perimeter of the doughnut and used a small seasoning lid for the inner circle.
- Heat up the electric skillet or deep fryer to 375. I cooked my best batch at 400, but I think they would have turned out better at a slightly lower temperature.
- Cook doughnut for 30-60 seconds per side. The trick here is to cook it less than you think. It should be lightly browned for best results. Do some tests. If you cook it too long, you lose moisture and dry it out. You may be able to do 40-50 seconds for the first side, but then only 30 seconds for the 2nd side.
- Icing! Mix the frosting, but keep it as thick as possible. Heat the frosting so that when you put it on the doughnut it is runny and creates a very thin layer, but cools quickly. This should make more of a shell on the top and keep it from absorbing into the donut. It also looks much better.
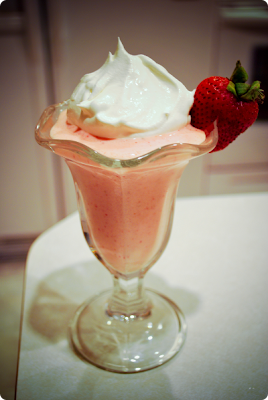 The Olive Garden restaurant has a great dessert/drink that is not listed on their menu, but is worth ordering at least once to give it a try. Since I enjoyed it so much, I attempted to duplicate the recipe. If it's not right, it's extremely close. Give it a try! Ingredients: - 1 cup strawberries
- 1/4 cup sugar
- 1 cup vanilla ice cream
- 1 1/2 cups ice
- 1/2 cup milk
Directions: - Blend all ingredients together.
- If it is too thick, add more milk.
- Top with whipped cream, if desired.
   My wife asked me to make some cinnamon rolls for a meeting that she was in charge of, so I proceeded to make a double batch. After all, I couldn't make a bunch of cinnamon rolls that I couldn't eat. Ingredients:- 2 cups scalded milk
- 1/2 cup shortening
- 1 cup mashed potatoes
- 2 tablespoons yeast
- 1/2 cup warm water
- 2 eggs, slightly beatedn
- 1 cup sugar
- 2 tsp salt
- 7 cups flour
Directions:Pour milk over shortening and allow to cool to lukewarm. Soften years in 1/2 cup warm water. Add milk mixture with eggs, sugar, salt, and mashed potatoes. Mix thoroughly. Add the flour in increments. Knead dough until soft and smooth. Transfer to a larger bowl and cover. Allow to rise until double. Divide dough in half, roll into rectangle 1/2 inch thick. Spread with butter or water so that the cinnamon sugar will stick. Sprinkle with cinnamon sugar. Roll up and cut into 10-12 slices. Dental floss works well to cut the dough. Place the floss under the roll and bring the floss up on both sides and cross them across the top, then pull out to slice the dough cleanly. Spray cooking spray on a baking sheet and place the rolls on the sheet. Allow to rise until roughly double in size. Bake for 20 minutes at 350 degrees. Ice with your favorite icing. Cream Cheese Icing
4 ounces cream cheese, softened 1/4 cup butter, softened 1 1/2 cups powdered sugar 1 1/2 teaspoons milk 1/2 teaspoon vanilla
 Sometimes a nice simple recipe is all you need. What I love about this recipe (besides the fish!) is the reminder that we have a lot of basic flavorings in our kitchens and it is easy to create something with a savory taste. We don't need "Marie Calendar" for that special flavor. We can make it ourselves, with a little experimenting. =) I made this tonight while listening to two of the IT staff on the phone. They were troubleshooting some upgrade complications and I was being supportive by offering suggestions, but mainly listening in case there was something I could help with. At the end of the phone call I offered them some garlic butter tilapia. Too bad they did not live closer to try it! Ingredients:- Uncooked tilapia fillet(s)
- Butter/margarine
- Garlic, chopped
- Salt
- Pepper
- Paprika
Directions:- Saute the garlic in the butter.
- Add the tilapia fillet(s) and salt and pepper lightly. I suggest cooking the "top" of the fillet first (top down) so that when you flip the fillet to finish the other side, you are looking at the finished product.
- While cooking the last side, dash some paprika on top.
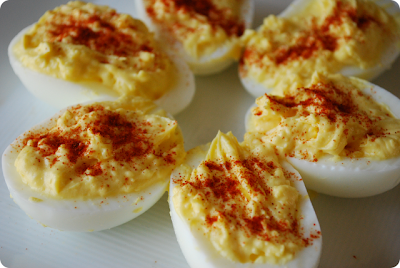 I love eggs, and it's nice to have a way to have eggs differently than the traditional breakfast preparation: fried, scrambled, etc. Deviled eggs are one of those foods that are simple to make yet satisfy my appetite for a while (thanks, protein!). Ingredients:- A few eggs
- Mayonnaise or Miracle Whip
- Sugar
- Paprika
Directions:- Hard boil the eggs. It's not necessary for the water to boil, but it needs to be hot. Cooking the eggs may take 10 - 15 minutes after the water is brought up to full heat.
- Cool the eggs by draining the hot water and adding cold water. Top the water with ice. Boiled eggs are best served cold, and I think this helps the insides set up.
- Slice the eggs in half length-wise.
- Remove the yolks to a bowl.
- Mix the above ingredients with the egg yolks. Using a fork to break and mix the yolks is an effective approach.
- Start with a small amount of Mayo/Miracle Whip and add more if you want it more creamy.
- A pinch of sugar is usually enough.
- Refill the egg white halves with your mixture.
- Shake a small amount of Paprika on each piece.
 Each time I watch a television show, view a magazine, or walk through the produce department of a store and see avocados, I have a hard time resisting them. Over the last few years I've developed a taste for these wonderful fruits. As a child, I saw guacamole dip and wondered why anyone would want to put something green on their tortilla chip. Now, I savor that "green dip" and found a good and simple recipe. Ingredients:- 2 avocados
- 1 tablespoon lime or lemon juice
- 1/4 cup chopped onions
- 1/4 cup diced green chiles (canned chiles are the easiest!)
- 1/4 cup diced tomatoes (I prefer regular tomatoes, not Romas or another variety)
- 1 teaspoon sugar
- salt
Directions:- Cut avocadoes, remove pit, and mash with a fork.
- Add all other ingredients. Salt to taste.
- Eat with your favorite tortilla chip.
 One of my favorite desserts is this cookie and ice cream duo. Some people call them a Fa'zookie, others call it a Skookie or some other trademarked name, but it's delicious no matter what you call it. I've tried placing a freshly-baked cookie in a bowl and topping it with ice cream, but the ice cream froze the cookie, which wasn't what I wanted. The benefit of the cast-iron mini-griddle is it keeps the cookie warm and soft. You just have to eat it soon after adding the ice cream because it also has the effect of melting the ice cream. Here is our chocolate chip cookie recipe: Ingredients2/3 cup margarine 2/3 cup shortening 1 cup sugar 1 cup brown sugar 2 eggs 1 tsp baking soda 1 tsp salt 2 tsp vanilla 3 cups regular flour Chocolate chips DirectionsMix everything but the chocolate chips, then add the chips at the end. Bake at 350 for approximately 10 minutes. I get better results baking these cookies on a stone instead of a metal sheet.
 A few years ago I bought a french fry slicer, but for the first time today I tried out the larger size blade. It was a nice to have a meatier fry. A friend of mine affectionately calls these " fat fries". I'm not sure if he's describing the fries or the people who eat them in excess. =) It's not difficult to make french fries, but there are a few techniques that help them turn out nicer. - Soak/rinse in water: this helps wash away some of the starch. If you don't do this, your french fries are more likely to stick together in the fryer.
- Follow this two-stage cooking process:
Step 1: Blanch the fries in the cooking oil at 350 degrees for about 5 minutes (for fat fries). This softens the whole potato. Step 2: Remove the french fries and let your oil heat up to 375 degrees. Put the fries back in and cook for another 5 minutes. This allows your fries to get crispy on the outside instead of crisping the entire fry.
 Announcing a whole new website in tribute of my favorite bread recipe. BestBreadRecipe.com has the recipe and instructions to create this bread that has become a family tradition. Many people have asked me for the recipe and I've shared it, but now it is even easier to share! If you want to get your taste buds going, visit the gallery. As of writing this post, BestBreadRecipe.com is ranked #5 in Google when you search for "best bread recipe". Not too shabby!
 When I was at the store this last week, I picked up some zucchini - green and yellow. Fortunately they were relatively small compared to the giant zucchini that gets grown in the everyday garden. My father-in-law taught me a tasty way to prepare zucchini that has me hooked. Heck, even my wife will eat it, and she's NOT a fan of vegetables.
Ingredients - Green zucchini
- Yellow zucchini
- Yellow onion
- Butter or margarine
Directions - Peel and slice the zucchini.
- Sauté diced onions in butter or margarine.
- Add the zucchini to the onions.
- Cook the zucchini on medium heat until they are tender enough to pick up with a fork and not soggy.
- Salt and pepper to taste.
 Today's inspiration comes from this website. I watched a Food Network show where I learned how bagels were made. I had no idea that bagels were first boiled before baked, so I thought I would give it a shot. It turns out that fresh bagels are really good! Ingredients - 4 cups bread flour
- 1 tablespoon sugar
- 1 1/2 tsp salt
- 1 tablespoon vegetable oil
- 1 1/2 cups warm water
Directions - Mix and knead the dough well.
- Cut into 8 equal pieces.
- Let rise for 10-20 minutes.
- Roll up the dough pieces into snakes and connect the ends to create the bagel look.
- Let sit for 20 minutes.
- Boil water and cook each side for 1 minute.
- Place the bagels on a lightly-greased cookie sheet and bake at 425 degrees for 10 minutes on each side (flip once). I pulled the bagels out about 3 minutes early because they looked like they were done... and they were. =)
 While my wife was out learning how to take better pictures, I decided to treat myself to a new sweet breakfast. I mostly followed this recipe to create a sandwich-like french toast. I didn't want a real bulky french toast "sandwich", so I thinly sliced some homemade bread made by a neighbor. Since it was a few days old, it was perfect as french toast bread.
To top it off, I added homemade strawberry jam, fresh strawberry pieces, and whipped cream. My mouth is watering just describing it again. Since it turned out so well, I made it for my wife for dinner the same day! Goes well with bacon.
The Ingredients - 2 ounces cream cheese
- 1/2 tsp. vanilla
- 1 egg
- milk
- a dash of nutmeg
- strawberry jam
- strawberries
- 4 slices of bread
- whipped cream
The Directions - Mix the cream cheese and vanilla. It's helpful to warm up the cream cheese for ease in mixing and spreading. Spread the mix on 2 slices of bread. Sanwich the pieces (filling side in!).
- Mix 1 egg with a little bit of milk -- 1 to 2 tablespoons. Add a dash of nutmeg.
- Dip the bread in the egg mixture or brush onto the bread to avoid making it more soggy than necessary.
- Cook both sides. For serving, I slice the sandwich diagonally to create 2 triangles.
- Warm up the strawberry jam. It helps keep the french toast warm instead of cooling it off.
- Add strawberries. I like them cubed.
- Add whipped cream.
Yield Makes 2 french toast sandwiches.
|
|
 insatiable appetite, unending curiosity


